29 December 2009

Springerle

With our oven repaired, I've started on making traditional German Christmas cookies, which is basically the only German food we make. Springerle have a distinctive taste that can take some getting used to (I like them much more now than I did as a kid, and they aren't for anyone who hates black licorice). I love the taste, but they are a family favourite because they are beautiful, impressed with hand-carved molds featuring German folk art. The molds are very hard to find outside of Germany (although I'm sure they can be found online) and every year my dad and uncle take turns with them, and my dad mails some of the finished product to his sister and my brother, both living far away. It wouldn't be Christmas without them, and that's why I've taken the pains to make them starting December 27th (it is quite the process). This is my grandmother's recipe.

Springerle (makes about 30 cookies, depending on size of molds)
Notes: These anise flavoured cookies, Springerle, have been described by some misinformed cook-book writers as beautiful but "hard and tasteless". Follow this recipe, store carefully, and you will see how wrong they are. For very fine sugar, grind granulated sugar in a blender at high speed to convert to fine sugar-1 cup at a time about 1 minute works well, and costs less than buying it in the store, if they carry it at all. Springerle molds come in the form of carved rolling pins and as flat rectangles. Keep these out of water. Clean with a stiff brush, pick out dried dough with the sharp tip of a bamboo skewer. It seems to help sometimes if the molds are cold (put in freezer between uses). Anise oil can be obtained from health food stores and from some pharmacies. It gives a much clearer and nicer flavour than anise extract. Anise seeds can be sprinkled on the baking sheet before putting the cookies on for added texture and a bit of taste.
  • 6 large eggs, room temperature
  • 3 cups/680g very fine sugar (aka fruit sugar, VeriFine™, NOT confectioners sugar)
  • 3/8 tsp salt
  • 3/8 tsp anise oil (3/4 tsp if using anise extract)
  • 1 large lemon, grated rind of
  • 6 cups/675g sifted flour, all purpose white (you can just whisk it for a while in a large bowl if you don't own a sifter or are not inclined to use one)
  • 3 tsp baking powder
In a large bowl of a stand mixer, beat the eggs and sugar together at medium speed for 1/2 hour (1 hour+ beating by hand with a whisk-I hope you have an electric mixer, it really does need to mix this long.) Mix in the salt, anise oil, and lemon rind slowly, just till blended.


Remeasure the sifted flour and and sift together with baking powder (or if you are whisking, not sifting, just whisk together). Fold/mix it into the egg/sugar mix with a wooden spoon (never electric mixer). This will make a very tender dough. Cover dough tightly with plastic wrap and refrigerate overnight.


Roll out about half the recipe, 3/8" (10 mm) thick on a floured counter. Press or roll the traditional German carved wooden Springerle molds into the dough deeply enough to make a clear impression. The molds should be lightly dusted with flour. Cut around the impression with a sharp floured knife, and transfer the cookies to a buttered baking sheet. Leave an inch between cookies.


Set aside in a warm place for 8-12 hours (overnight) for the patterns to air-dry thoroughly, so the baking won't destroy them.
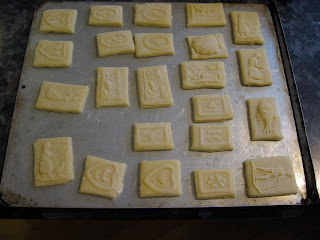


Bake at 300˚ (150˚ C) for 15-20 minutes (until very light yellow, NOT browned at all). Larger cookies may need slightly more time. Remove immediately from the cookie sheets to racks for cooling.

To keep them from drying out and becoming hard, store the cookies in an air-tight container or zip-lock plastic bag which should be kept closed except when taking cookies out to eat. An apple slice wrapped loosely in foil can be included to help maintain humidity. Store for at least one week.

24 December 2009

Barbecued Citrus Pork Roast & Orzo with Brown Butter

Sunday at home means time for a roast, and this time it was to be pork. I found a great winter-y recipe for a citrus flavoured pork loin with accompanying gravy that makes use of the seasonally-ubiquitous boxes of clementines (Christmas oranges, if you will) sitting on everyone's counter. This great plan almost ended in disaster as our oven appeared to be getting no warmer. Turns out it was broken and thankfully has been repaired as of this morning (which could be seen as a Christmas miracle, but is to me a blow, as I had nearly convinced my parents of the merits of deep-frying our turkey). But for that night, with the roast ready to go, it was time to turn to the barbecue.


Pork Loin with Citrus
(adapted from Cooking with Les Dames D'Escoffier serves 6 or 3 with leftovers)
  • 3 lb centre-cut boneless pork loin
  • 1 tbsp zest from clementines or tangerines
  • 2 tsp dried oregano
  • 1 tbsp olive oil
  • 1 tsp salt
  • 1/2 tsp ground cumin
  • 1/4 tsp ground black pepper
  • 400 ml chicken broth
  • 1/2 cup juice from clementines/tangerines (approx 4-use the ones you zested)
  • 3 tbsp easy-blend flour (or all-purpose)
1. Set pork on wire rack inside baking pan. Mix zest, oil and all spices in a small bowl and rub mixture onto the pork. Let sit for 15 minutes.
2. Preheat oven to 350˚ (or heat barbecue to 400˚, and turn off one side) Pour broth into the baking pan and roast until the pork is cooked to 160˚, about 2 hours. If using barbecue, place pan on the side you've turned off. Add more broth or water as needed.
3. Transfer cooked pork to a cutting board and let stand while you prepare the gravy. Whisk juice with flour (easy blend is ideal but not necessary) in a small saucepan, add pan drippings and place over medium heat. Bring to a boil and stir until thick and bubbly. Serve sliced pork with gravy.

Part Two

I can't believe I've gone this long without brown butter in my life. Brown butter is made by melting regular butter until the water evaporates and the milk solids begin to brown, creating a richer, nuttier flavour. I first used it in brown butter mashed potatoes that I will be recreating for Christmas dinner, but honestly I can't think of a food this wouldn't make elevate to the next level of decadence. Pasta is much less work-no peeling needed and a faster cook time get the brown butter in your mouth faster.

Brown Butter Orzo with Toasted Pine Nuts
  • 1 cup orzo (rice-shaped pasta)
  • 2 tbsp butter
  • 2 tbsp pine nuts
1. Toast nuts lightly in a small skillet until browned, or in the oven.
2. Melt butter in a large skillet and continue heating until water evaporates and milk solids begin to brown, and remove from heat. Stainless steel is best so that you can see your butter change colour (cast-iron is a fail for this) and not have it stick. Careful not to let it go too far.
3. Meanwhile, bring water to a boil, add salt and orzo and cook until al dente (about 6 minutes). Drain pasta and add to skillet with nuts and butter over low heat, turning to coat.


We also had zucchini quickly and easily sautéed, lest you think we don't eat any vegetables.

21 December 2009

Montreal vs. New York Bagel Showdown

This week I was presented by a unique opportunity to conduct a side by side taste-test of Montreal bagels and New York bagels. As I'm home for break we can get St. Viateur bagels at a local grocery store and my dad's intern went to Long Island for the weekend and brought us some New York bagels. Neither were day-of fresh, but both samples had traveled similar distances and lived comparable shelf-lives. What is the difference, you may be asking. A bagel is a bagel is a bagel, isn't it? Certainly not!

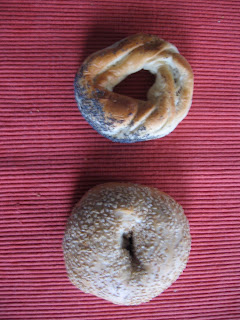
As you can see in the picture, Montreal style bagels are small and dense, in contrast with puffier New York style bagels. In many New York bagels the hole almost disappears due to the puffyness but Montreal bagels are decisively ring-shaped. Montreal bagels are boiled in honey-water before baking and contain sugar, lending them a sweeter flavour, while New York bagels tend to be saltier, boiled in plain water. Montreal bagels are baked in a wood-burning oven, and are attractively browned in places, while New York bagels are baked in a standard oven and have a more uniform look. Traditionally, Montreal bagels were either sesame or poppy-seed, though there are more varieties today (including the abomination that is the whole-wheat bagel). New York bagels come in a range of flavours, perhaps most deliciously pumpernickel and everything.

A word about other bagels: Some bagels do not deserve to be in either category. While I am a Canadian college student and so frequent Tim Horton's, their bagels are simply not in the same league, but by their sheer blandness make every bite of a true bagel, New York or Montreal, so much better. I had high hopes for a Bagel World that was to open near campus, but those high hopes led to grave disappointment when it finally opened (it has since closed). Montreal bagels can be ordered from St. Viateur and some excellent grocery stores (like Pete's Frootique in Halifax) stock them. My Market Bakery in Toronto's Kensington Market makes a good Montreal bagel. I have not found a great New York style bagel in Canada, but I haven't been looking too hard.

Sesame New York bagel toasted with butter and cream cheese:


Poppyseed Montreal bagel toasted with butter and cream cheese:


I will admit my bias, if it has not already become clear. Montreal bagels are one of my favourite foods, and as soon as I have my own freezer it will be forever stocked with mail-ordered St. Viateur's. They are dense, chewy and slightly sweet-to me they are what a bagel ought to be. New York bagels are chewy but in a very different way-they are breadgels. They can never achieve the crisp excellence of a toasted Montreal bagel due to their sheer bulk. This bulk can come in handy if you simply want a tasty vessel for whichever sandwich meats strike your fancy, but in pure, classical applications of the bagel (toasted, with cream cheese or butter), Montreal wins by a landslide. I realize that the bagel wars are divisive and I can appreciate that both have their strengths-it really depends on what you are looking for in your bagel, and in large part this is shaped by what you grew up with. Both are delicious topped with cream cheese and smoked salmon (but really what wouldn't be?), though in a simple preparation, there is no contest.

16 December 2009

Mussel Mayhem

I am home in Halifax for break and that means savouring the seafood, beginning with mussels which are relatively cheap and quickly devoured. Due to an unfortunate fall that broke my dad's wrist, it also means I am in charge of dinner most nights, and this one was quick to get on the table and uses only one pan. It comes from the beerbistro cookbook, a Toronto restaurant I've actually never been to (but will be checking out soon). I got this exciting cookbook and several others at the library, which is a great way to test-drive books and especially great for me, on a student budget with no kitchen, and thus no means or practical reason to purchase cookbooks, though many are making the cut for my cookbook wishlist when I finally have a kitchen of my own.

All of the recipes in this book use beer, somehow-in salad dressings, as a marinade, even in desserts. They have pretty specific recommendations for the best beer to use in each recipe, but my dad is a longtime home brewer so I just substituted one of his IPA's for the helles lager called for-the beer flavour is subtle in the finished product as most of it steams off.

Mussels with Tomato and Beer (serves 2-4)
  • 2 tbsp butter
  • 1 small red onion, thinly sliced
  • 2 cloves garlic, chopped
  • 2 lbs mussels
  • 6 tbsp beer-helles recommended, any IPA a good substitute
  • 2 tbsp tomato sauce
  • 1 plum tomato, diced
  • 2 tsp chopped tarragon
1. Melt butter and sauté onion and garlic about 1 minute. Add your cleaned mussels (just a quick rinse will likely do for most store-bought mussels) and cook 30 seconds.
2. Add beer and tomato sauce to mussels, shake to distribute evenly, then cover and steam mussels for about 3 minutes.
3. Add tomato and tarragon, and let boil uncovered to reduce sauce for 1 minute. Discard any mussels that have not opened. Distribute into bowls and serve alongside crusty bread to soak up extra broth.

10 December 2009

Stollen my heart

My German heritage does not figure prominently in my life-I don't speak it, I've never been, none of my immediate family members were born there. Basically, I'm blonde and have an affinity for beer and clean design. But Christmas is a different story altogether. Every year my dad and I make at least 4 different kinds of traditional German Christmas cookies (coming soon) and stollen. Stollen is a sweet bread (not to be confused with sweetbread), almost the consistency of shortbread that is covered in powdered sugar. This is certainly not a health food, but it's Christmas! Our family version uses raisins (lately Craisins too), currants, candied fruit and almonds.

My dad actually made this before I arrived home (a couple were shipped to my brother and my aunt-loaves also freeze well), so I am grateful to be using his photos and his recipe, as handed down by my great-grandmother. The top of the index card reads ""Like Grandma Retter and Grossmutter Ressel made!" wrote Ilse Zimmer, mother of Peter (my dad), Chris & Julie."

Austrian Stollen (makes 2 loaves)
  • 4 tsp quick-rise instant yeast
  • 1 tsp salt
  • 1/2 cup sugar
  • 1 cup lukewarm milk
  • 7 egg yolks
  • 1 tsp vanilla
  • grated rind from 1/2 lemon
  • 1/2 cup softened unsalted butter
  • 5 cups flour
  • 3/4 cup white raisins (substitute Craisins for some or all of this)
  • 1/2 cup currants
  • 1/4 brandy (or sherry)
  • 1 cup mixed diced candied fruit
  • 1/3 cup blanched sliced almonds, lightly toasted
1. Combine in a large bowl the eggs, sugar, salt, vanilla, lemon rind and milk. Add yeast and 3 cups flour to make a soft dough. Beat vigourously with a wooden spoon for 5 minutes, let rest 10 minutes or so. Mix in another 2 cups of flour and the softened butter to make a soft and slightly sticky dough.

2. Turn out dough onto a floured board for kneading. Work in just enough flour while kneading so that the dough loses any stickiness, and then knead for at least 10 minutes, until dough is elastic and shiny. Form into a ball.

3. Place in a well-buttered bowl, turning so all surfaces are buttered. Cover with a towel and put in a warm place to double. Punch down, and knead lightly again. [The dough could be refrigerated for 3 or 4 days at this point]

4. Mix fruit and brandy. Let stand for 1 hour, stir from time to time. Drain excess liquid. (I drink it - Yummy! -IZ [my grandmother!]). Knead the fruit and almonds into dough.

5. Butter a large baking sheet very thickly. Cut dough in half. Roll out each piece into an oval 1/2 as large as baking sheet. Fold each oval so that bottom edge extends beyond top. Turn this back to form a small roll and fold. Place both ovals on baking sheet, well apart so that they do not rise and touch while baking. Let rise until puffy. Brush top with melted butter. Bake for 45-50 minutes at 375˚.


6. Remove to racks to cool. Brush tops with butter while warm, and again after they cool. Dust with confectioner's sugar, and repeat before serving.


Sneak slices whenever you can find an excuse to go to the kitchen. They are heavenly toasted with butter, especially on Christmas morning.

Milanesa Madness

A couple weeks ago I attended a cooking class hosted by OLAS, the Organization of Latin American Students here at U of T. It was a great afternoon-I met some new people in my program, practiced my Spanish and made all sorts of tasty treats. Milanesas are breaded meat fillets, typical of the Southern Cone (the guy who was teaching me to make these is from Argentina). They can be made with beef, chicken, or veal-we used thin slices of eye of round. They are typically fried, but these were made in the oven-a little healthier.

Milanesas (makes 20)
  • 20 thin slices of beef (eye of round preferable and cheap)
  • 4 eggs, beaten
  • 2 tsp chopped parsley
  • 2 cloves of garlic, minced
  • Lots of breadcrumbs
  • couple glugs of canola oil
  • Lemon juice (optional)
  • Grated cheese (optional)
1. In a large bowl, mix the eggs, parsley and garlic.
2. Toss in the meat and mix to coat, letting it sit approx 20 minutes.


3. Spread out breadcrumbs on a large plate/platter and individually press the macerated pieces of meat into breadcrumbs to bread them and pound the slices thinner. If you don't want to make the full recipe, this is the point where they can be frozen and quickly cooked when you are ready to eat them.


4. On a baking tray with a light coating of oil, arrange as many milanesas will fit and bake 10 minutes in a 400˚ oven. After 10 minutes, flip and if you are adding cheese, just grate some on now. Bake 10 more minutes.


If you haven't used cheese, they are great with a bit of lemon juice on top. This recipe makes so many, so if you aren't feeding a crowd save some for sandwiches or freeze extras (pre-cooking).