
16 November 2013
1 November 2010
Brown Sugar Pumpkin Pie
I have made this pie twice in one week. I had extra pumpkin, yes, but it really is fantastic. It's veering into the 'much too much' category for me-ultra rich, ultra sweet- but my roommate is in love. Maybe you will be too.
The recipe comes from Bon Appetit's Thanksgiving issue from 2009, and I've made no modifications. You can find the recipe here.
It looks much more elaborate than the Sour Cream Pumpkin Pie, but is actually much less involved (no cooking of the filling pre-baking).
Start by making the streusel-y topping (chopped walnuts-though you could definitely swap these for other nuts-pecans, hazelnuts, even almonds would be nice, brown sugar, cinnamon and a touch of salt):
 Roll out your pastry and fit into the pie shell, decorating the edges if you like. Compare this shell (made while watching Waitress and drinking beer) with second version, where I was all neat and fancy with triangle cut outs. Remember the risks of distracted baking.
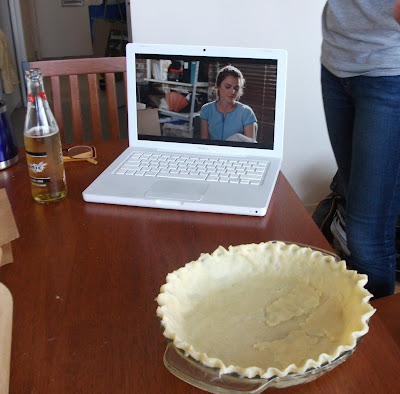

The shell is then blind baked with pie weights/pennies/beans to hold its shape.
 You can easily prepare the filling by hand or by mixer, simply by combining the brown sugar, spices, eggs, pumpkin purée and heavy cream.
 Fill your shell and bake until filling is jiggly but the top has set. Cover with brown sugar/nut mixture and continue to bake until the filling is puffed and topping has browned.
 It can be served at room temperature or cold, and goes best with cinnamon whipped cream.
18 October 2010
Sour Cream Pumpkin Pie

Gourds are taking over. They're everywhere-decoratively perched outside of otherwise soulless corporate supermarkets, overflowing at farmer's markets, begging you to pick them at local farms. There's something romantic about making pumpkin pie with the flesh of a pumpkin you picked, roasted, and scooped out its innards with your very own hands. But it is seriously not worth the hassle, get the canned stuff.

For one thing, the giant jack-o-lantern pumpkins that make up the bulk of these kitschy displays do not a good pie make. If you insist on a truly DIY pie, go for the smaller pie pumpkins. But it's messy, inconsistent and time intensive compared to readily available canned or frozen pumpkin purée which will produce better results in most cases.
Canned pumpkin purée served me well in this year's Canadian Thanksgiving pie making endeavor. See last year's here. I went for a sour cream pumpkin pie recipe from Gourmet Today, which nicely cut the sweetness of the pumpkin and gave a bit of welcome tang.
For the crust:
- 1 1/4 cups flour
- 1/4 tsp salt
- 1/2 cup unsalted butter, cold and cut into 1/2 inch cubes
- 3-4 tbsp ice water
Mix flour and salt in a large bowl and cut the butter in with a pastry cutter, a couple knives, a food processor or a stand mixer (I've had good results with this, just make sure the butter is really cold). You want small pea sized lumps of butter-the idea is not to cream but to leave these lumps which will turn into glorious flaky pastry. Add in just enough water so your dough comes together, and divide into 4 portions (this next step I hadn't done before and am not sure it made a huge difference, but if Gourmet says so...). On a lightly floured surface, smear each portion forward with the heel of your hand. This helps distribute the fat. Once completed or skipped, gather all the dough into a ball, flatten into a 5-inch disk and wrap and refrigerate at least one hour. I usually make the dough a day ahead to save time. It also freezes well.
When you are ready to roll out your dough, lightly flour your surface or place the dough between two sheets of parchment paper. Preheat the oven to 375˚. Trying to keep it as cool as possible, roll out your dough until it will fit a 9-inch pie plate. Because pumpkin pie has a custard filling, the crust is blind-baked (pre-baked sans filling). Once you fit the dough into the pie plate and decoratively crimp the edges to your liking, prick all over with a fork and fill with pie weights, dried beans or even pennies (make sure you line your pastry shell with foil first).

 Using a pyrex pie dish is the best way to check in on browning. Bake your shell approximately 20 minutes with the weights in, and an additional 10 without, until pale golden. Cool completely.
Meanwhile, get to work on your filling:
- 1 1/2 cups sour cream
- 1 1/2 cups pumpkin
- 3 eggs, separated
- 1 cup brown sugar
- 3/4 tsp cinnamon
- 1/4 tsp nutmeg
- 1/4 tsp ginger
- 1/4 tsp salt
Heat 1 cup of the sour cream (reserving 1/2 cup) in a large metal bowl set over a pot of boiling water until warm, stirring occasionally.
In another bowl, whisk together the pumpkin, egg yolks, brown sugar, spices, salt and reserved 1/2 cup of sour cream. Add to hot sour cream and cook over simmering water, stirring occasionally for about 6 minutes to thicken the custard.
Remove bowl from heat and cool in an ice water bath (in a larger bowl, or if you're out of larger bowls, the sink), stirring occasionally until cool.
Whisk egg whites with an electric mixer (difficult to do without) until they hold stiff peaks. Gently fold 1/3 of the egg whites into the pumpkin mixture and slowly incorporate the remaining whites.
Pour filling into your cooled shell and smooth the top (mine kind of overflowed, but it will all work out). Bake until filling is set and puffed around the edges, 40-50 minutes. Allow to cool to room temperature and serve with whipped cream, dosed with cinnamon if you feel like getting fancy.

25 August 2010
Let's go to the Food Building!
Torontonians, you have two weekends left to get yourself to the Ex. The Canadian National Exhibition features scheming carnies, rides of dubious safety, entertainment that ranges from middling to deafening (Air Show anyone?) and a smorgasbord of culinary innovation. Yes, innovation. Ex vendors boldly deep-fry what no one has deep-fried before, and the results are heavenly. Along with gastronomic breakthroughs the CNE features typical carnival fare (for Toronto): neon sno-cones, many varieties of fried dough, fries, burgers, pizzas, shawarma, dim sum, sushi, pho, falafel and more, all under the magnificent roof of the food building.
 I crave Tiny Tom's conveyor belt mini donuts year-round, and seek them out at any outdoor Toronto fest, whether Word on the Street or the Weed March. This year marks their 50th anniversary and I got a little festive. My favourites are icing sugar or cinnamon, $5/dozen, or 4 dozen for $15.
 Dollar spaghetti doesn't really appeal to me, but it keeps coming back year after year.
 It is after all the Canadian National Exhibition and poutine is heavily featured along with other so-called national dishes.
 I don't know why I thought this would be a good idea but the take-out dim sum was truly atrocious (Chinatown is cheaper and infinitely better).
 The Lemon Ladies.
I admit I am late to the game on this one. I've been hearing tell of the delights of deep-fried chocolate bars for years, but this was my first taste.
 And it won't be my last. The crisp batter coating is an excellent balance for the melting chocolate-caramel confection.
 It was the same stand's deep-fried butter that's been making headlines. This is not in the Food Building, but rather fairly deep into the midway, near the Canadian Armed Forces display. At first I was a bit reluctant to ask people if they knew where it was fearing judgment, but everyone was happy to point the way, noting that it seemed hugely popular.
 Small balls of butter are frozen onto toothpicks, then dipped in the same batter coating as the Mars bars.
 After frying they are topped off with a squirt of chocolate, caramel or strawberry sauce.
 When ready, the butter has melted inside the donut-like coating and biting in frees the butter from this doughy cage. I don't think I could eat more than four as they are quite rich, but it really is delicious.
Good, unpretentious, possibly fatal treats await you at the Ex! Let's go!
10 August 2010
Blueberry Cobbler
It's finally here. After months of waiting, I got the call. If anything was going to shake me out of a sweaty summer cooking hiatus, it was this.

Thanks, Toronto Public Library. Thomas Keller's most recent tome claims to feature accessible and simple food. This is half true-there are some simple dishes to be certain but the majority call for ingredients and tools the average home cook won't have on hand. I can't pick up piment d'Espelette at the nearest grocery and my budget certainly won't allow for a blow torch right now, but I can dream.
In fact, I was so inspired by this beautifully composed book I chose to forgo sleep a few nights
ago for some late night baking. The blueberry cobbler seemed simple enough and I had all the ingredients on hand by some miracle.
Blueberry Cobbler
- 1 3/4 cup + 2 tbsp flour
- 1/2 tsp baking powder
- 1/2 tsp baking soda
- 6 tbsp / 3 oz / 3/4 of a stick/ 1/3 of a cup
- 1 cup + 1 tbsp sugar
- 2 eggs
- 1/2 buttermilk (I substituted yogurt with no problem)
- 4 pints/8 cups blueberries (sacrilege-I used frozen and it worked out alright. But it's wildblueberry season in my lovely home province of Nova Scotia so I urge you to seek out the good stuff)
- 1 tbsp lemon zest
- 1/4 tsp cinnamon sugar
Heat oven to 350˚.
In a medium bowl sift or whisk together 1 3/4 cups flour with the baking powder and baking soda.
In a large bowl cream butter and 3/4 cup sugar (by hand or with stand mixer) until light and creamy-make sure butter has come to room temperature before you begin. Beat in the eggs (also at room temp) one at a time until incorporated. Add the flour mixture in 3 batches,
alternating with the buttermilk/yogurt added in 2 batches. Flour, buttermilk, flour, buttermilk, flour.
In yet another large bowl, mix the blueberries with 1/4 cup of sugar, 2 tbsp flour and the lemon zest. If using frozen berries there is no need to thaw before using. Spread berries evenly in an 11 inch square or 13 by 9 inch baking pan.
Spoon batter over the berries in clumps, leaving some space in between. Combine the
remaining 1 tbsp of sugar with the cinnamon and sprinkle over top.

Bake approximately 40 minutes, until berries are bubbling and the topping is golden brown.

Let stand at least 10 minutes before serving. For best results serve with vanilla ice cream or whipped cream. It will keep for several days.

24 July 2010
Sandwiches: More than fine
With the heat in Toronto this summer, I'm actually kind of grateful for my basement living situation. I will take cool and damp and dark over hot and sticky any day. I'm mostly living off of popsicles right now, but sandwiches offer a little more sustenance and so I offer you a round-up of Toronto sandwich news and a sandwich of my very own.
First of all, Sandwich Box is opening a new location at Bay and Bloor which I am thrilled about, because since the Queen St. W location shut down over a year ago, I've had to find excuses to visit the Financial District. Although in a cruel twist of fate, I will likely be graduated by the time it opens and actually work near the Financial District locations. As long as I have regular access to this gourmet Subway with excellent packaging, I'm happy. No opening date posted yet but renovations have been going on for a couple months now. Soon, I hope!
Sky Blue Sky Sandwich has been open for months but I was late to the game and have only started going this summer. They have a huge customizable sandwich menu, all named after Wilco songs (if you're into that kind of thing) with lots of vegetarian choices (if you're into that kind of thing). So far I've tried the Casino Queen (turkey with a balsamic onion marmalade, bacon, and avocado) and the We're Just Friends (chicken with roasted red peppers, Swiss cheese and red onions), both of which have been stellar though in the future I will ask for them to be buttered before grilled as they were a shade dry. The bread is craving-worthy, with several varieties (three cheese, honey-nut whole wheat, cranberry cream cheese) baked in house daily. I also tried the avocado-cucumber soup which was the perfect choice for a sweltering afternoon. The owner is incredibly friendly and happy to chat. Best of all, all sandwiches are under five dollars. There can be a bit of a wait if you come at a peak time, but there is the option of emailing your order so it's ready for pick-up. The future.
Lastly in sandwich news, two of my favourite restaurants are facing off this Sunday at Deli Duel, as a fundraiser for The Stop Community Food Centre. Caplansky's, The Stockyards and Goldin's are the names, smoked meat's the game. Sandwiches are three dollars and admission is free. Caplansky's has never failed to impress in the smoked meat department (I'm partial to the smoked meat poutine) and other deli fare. I wouldn't call The Stockyards a deli, but I would bet that their smoked meat is a contender, after having tried their barbecue options. Goldin's I have never heard of before, so I'm looking forward to tasting what they have on offer. Deli Duel is tomorrow at 1pm at Wychwood Barns, on Christie at St. Clair.
Finally, I leave you with a fancy BLT that was just the thing on a night too hot to turn on the oven. Bacon, spinach, tomato and fresh mozzarella grilled until crisp and melty. Simple and delicious.

4 July 2010
Freedom Pie
Inspired by the patriotic pies on the cover of the Martha Stewart Living and my American heritage, I pillaged the remaining rhubarb in the garden and I got baking.

The pastry is made just like this and with the help of some star-shaped cookie cutters. I know a lot of people are strawberry-rhubarb pie-hards but to me it is just too cliché and sickly sweet. The entire point of rhubarb is its tartness, in my opinion. It might not be to everyone's taste, but I have fond memories of dipping stalks into some sugar and gnawing away. This pie is that memory, grown-up and elevated.
Rhubarb Pie (adapted from Joy of Cooking)
Combine rhubarb with 1 1/2 cups of sugar, tapioca or cornstarch, zest and salt in a large bowl and let sit for 15 minutes, stirring occasionally.
It should go from this:

to this:

Spoon this filling into your prepared pie crust (again, see this post) and dot with butter before covering with a basic lattice, or this festive variation. You can even do a double crust with vents if you don't want to bother with the occasional frustration of lattice tops, although I think they are worth it. I'm including some photos of a previous plain-old lattice top rhubarb pie which in my mind also screams 'America', if that's what you're going for. Not such a bad idea to double the recipe as it keeps well and makes a nice breakfast.
 Once your lattice or top of choice is affixed, brush with cream or milk and dust with sugar. You can crimp the edges with a fork or more creatively.
Bake at 425˚ for 30 minutes, then lower the heat to 350˚ and bake 25-30 more minutes until crust is nicely browned and juices are bubbling. Cool completely on a wire rack.


The pastry is made just like this and with the help of some star-shaped cookie cutters. I know a lot of people are strawberry-rhubarb pie-hards but to me it is just too cliché and sickly sweet. The entire point of rhubarb is its tartness, in my opinion. It might not be to everyone's taste, but I have fond memories of dipping stalks into some sugar and gnawing away. This pie is that memory, grown-up and elevated.
Rhubarb Pie (adapted from Joy of Cooking)
- 2 lbs rhubarb stalks, trimmed and cut into 1-inch lengths, which should measure 5 cups (no metric for you on this 4th of July)
- 1 1/2 cups sugar + 2 tsp
- 1/4 cup tapioca or cornstarch (I generally use cornstarch but both work great)
- 2 tsp orange zest (optional but highly recommended)
- 1/4 tsp salt
- 2 tbsp butter
- Milk or cream
Combine rhubarb with 1 1/2 cups of sugar, tapioca or cornstarch, zest and salt in a large bowl and let sit for 15 minutes, stirring occasionally.
It should go from this:

to this:

Spoon this filling into your prepared pie crust (again, see this post) and dot with butter before covering with a basic lattice, or this festive variation. You can even do a double crust with vents if you don't want to bother with the occasional frustration of lattice tops, although I think they are worth it. I'm including some photos of a previous plain-old lattice top rhubarb pie which in my mind also screams 'America', if that's what you're going for. Not such a bad idea to double the recipe as it keeps well and makes a nice breakfast.
 Once your lattice or top of choice is affixed, brush with cream or milk and dust with sugar. You can crimp the edges with a fork or more creatively.
Bake at 425˚ for 30 minutes, then lower the heat to 350˚ and bake 25-30 more minutes until crust is nicely browned and juices are bubbling. Cool completely on a wire rack.


Subscribe to:
Posts (Atom)